1.1. 准备部分#
Note
Sphinx 项目需要 Python 环境来支持,在此不对如何安装 Python 进行说明. 有需要的可以通过 Python官网 单独下载.
1.1.1. 安装 Sphinx 并下载必要的包#
安装 Sphinx 库以及 sphinx-rtd-theme 主题库。
pip install sphinx
pip install sphinx-rtd-theme
1.1.2. 在项目根目录运行生成文档命令 sphinx-quickstart#
Eugene-Forest@DESKTOP-4BMMHQP MINGW64 ~/workspace-vscode/ReadTheDocs/NewDocs
$ sphinx-quickstart
欢迎使用 Sphinx 4.3.2 快速配置工具。

请输入接下来各项设置的值(如果方括号中指定了默认值,直接
按回车即可使用默认值)。

已选择根路径:.

有两种方式来设置 Sphinx 输出的创建目录:
一是在根路径下创建“_build”目录,二是在根路径下创建“source”
和“build”两个独立的目录。
> 独立的源文件和构建目录(y/n) [n]:

项目名称将会出现在文档的许多地方。
> 项目名称: newbooks
> 作者名称: eugene
> 项目发行版本 []: 0.1

如果用英语以外的语言编写文档,
你可以在此按语言代码选择语种。
Sphinx 会把内置文本翻译成相应语言的版本。

支持的语言代码列表见:
http://sphinx-doc.org/config.html#confval-language。
> 项目语种 [en]: zh_CN

创建文件 C:\Users\qaz22\workspace-vscode\ReadTheDocs\NewDocs\conf.py。
创建文件 C:\Users\qaz22\workspace-vscode\ReadTheDocs\NewDocs\index.rst。
创建文件 C:\Users\qaz22\workspace-vscode\ReadTheDocs\NewDocs\Makefile。
创建文件 C:\Users\qaz22\workspace-vscode\ReadTheDocs\NewDocs\make.bat。

完成:已创建初始目录结构。

你现在可以填写主文档文件 C:\Users\qaz22\workspace-vscode\ReadTheDocs\NewDocs\index.rst 并创建其他文档源文件了
。 用 Makefile 构建文档,例如:
make builder
此处的“builder”是支持的构建器名,比如 html、latex 或 linkcheck。
最后生成的项目结构如下:
build 、 _build 文件夹: 用来存放通过make html生成文档网页文件
source 文件夹: 存放用于生成文档的源文件
conf.py 文件: Sphinx的配置文件
index.rst 文件: 主文档
_static 、 _template 文件夹: 用来存放静态文件或模板html

Fig. 1.1.1 非独立的源文件和构建目录#
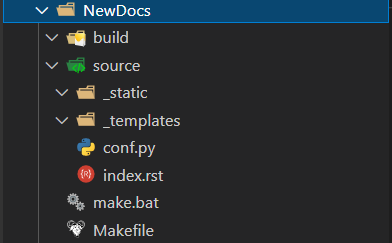
Fig. 1.1.2 独立的源文件和构建目录#
1.1.3. 配置主题#
在conf.py文件中配置以下属性以替换主题:
# 头部添加导入
import sphinx_rtd_theme
# 找到主题属性更改如下
html_theme = 'sphinx_rtd_theme'
Note
更多主题配置点击查看 HTML Theme 笔记.
1.1.4. 通过vscode的git插件创建存储库#
创建完之后,添加.gitignore文件以及README.md文件
本项目的.gitignore文件代码如下:
# OS files
.DS_Store

# Byte-compiled / optimized / DLL files
__pycache__/
*.py[cod]
*$py.class

# C extensions
*.so

# Distribution / packaging
.Python
build/
develop-eggs/
dist/
downloads/
eggs/
.eggs/
lib/
lib64/
parts/
sdist/
var/
wheels/
share/python-wheels/
*.egg-info/
.installed.cfg
*.egg
MANIFEST

# PyInstaller
#  Usually these files are written by a python script from a template
#  before PyInstaller builds the exe, so as to inject date/other infos into it.
*.manifest
*.spec

# Installer logs
pip-log.txt
pip-delete-this-directory.txt

# Unit test / coverage reports
htmlcov/
.tox/
.nox/
.coverage
.coverage.*
.cache
nosetests.xml
coverage.xml
*.cover
*.py,cover
.hypothesis/
.pytest_cache/
cover/

# Translations
*.mo
*.pot

# Django stuff:
*.log
local_settings.py
db.sqlite3
db.sqlite3-journal

# Flask stuff:
instance/
.webassets-cache

# Scrapy stuff:
.scrapy

# Sphinx documentation
docs/_build/

# PyBuilder
.pybuilder/
target/

# Jupyter Notebook
.ipynb_checkpoints

# IPython
profile_default/
ipython_config.py

# pyenv
#   For a library or package, you might want to ignore these files since the code is
#   intended to run in multiple environments; otherwise, check them in:
# .python-version

# pipenv
#   According to pypa/pipenv#598, it is recommended to include Pipfile.lock in version control.
#   However, in case of collaboration, if having platform-specific dependencies or dependencies
#   having no cross-platform support, pipenv may install dependencies that don't work, or not
#   install all needed dependencies.
#Pipfile.lock

# PEP 582; used by e.g. github.com/David-OConnor/pyflow
__pypackages__/

# Celery stuff
celerybeat-schedule
celerybeat.pid

# SageMath parsed files
*.sage.py

# Environments
.env
.venv
env/
venv/
ENV/
env.bak/
venv.bak/

# Spyder project settings
.spyderproject
.spyproject

# Rope project settings
.ropeproject

# mkdocs documentation
/site

# mypy
.mypy_cache/
.dmypy.json
dmypy.json

# Pyre type checker
.pyre/

# pytype static type analyzer
.pytype/

# Cython debug symbols
cython_debug/

.vscode/
node_modules/
本项目的README.md文件代码如下:
# sphinx study
[](https://hz-sphinx-study.readthedocs.io/en/latest/?badge=latest)
a notebook for studying sphinx documenter.
This repo is a expeiremental notebook for studying how to use sphinx to build a online docsite.
[status admin](https://readthedocs.org/projects/hz-sphinx-study/)
## Build
The following command will install the packages according to the configuration file requirements.txt.
install
```bash
pip install -r requirements.txt
```
freeze
```bash
pip freeze > requirements.txt
```
list
```bash
pip list
```
## How to Create Python Requirements File After Development
While it is possible to create it manually, it is a good practice to use the pipreqs module. It is used to scan your imports and build a Python requirements file for you.
According to [THE DOCUMENTATION](https://github.com/bndr/pipreqs), once installed with the following command:
```bash
pip install pipreqs
```
running pipreqs in the command line generates a `requirements.txt` file automatically:
```bash
$ pipreqs /home/project/location
Successfully saved requirements file in /home/project/location/requirements.txt
```
1.1.6. 不同文件下的 tab 键行为控制#
这个功能配置可选择性添加,如果不使用 rst 文件编写笔记,那么这个功能也没有用;但是如果你打算使用 rst 文件编写笔记,甚至打算使用 rst 和 md 文件混合编写笔记,那么就有必要控制 tab 键的行为,因为 RestructureText 语法中的指令的内容和可选项都需要缩进 3个空格。,虽然可以连击三个 space,但是显然直接使用 tab 键更快捷。
由于笔者使用 VsCode 编写笔记,然后发现通过分别设置 用户、工作区、文件夹的 settings.json 文件中的 "editor.tabSize": 3 属性都没有很好的设置到 tab 的空格数。所以笔者索性通过插件 EditorConfig for Visual Studio Code 使用 .editorconfig 文件来格式化不同文件下的 tab 键。
1 2 3 4 5 6 7 8 9 10 11 12 13 14 15 16 17 18 19 20 21 22 | # EditorConfig is awesome: https://EditorConfig.org
# top-most EditorConfig file 表示是最顶层的配置文件,发现设为true时,才会停止查找.editorconfig文件
root = true
# Set default charset
[*.{rst,py,md,txt,html,xml,java}]
charset = utf-8
# Unix-style newlines with a newline ending every file 对于所有的文件 始终在文件末尾插入一个新行
[*]
end_of_line = lf
insert_final_newline = true
# 4 space indentation 控制py文件类型的缩进大小
[*.{py,md,java}]
indent_style = space
indent_size = 4
[*.rst]
indent_style = space
indent_size = 3
|